Many of you will know French Lin if you have visited the shop. Those of you who are unable to visit us may recall the card I made for her last Year?! A tough one to top I grant you! So, I decided to go in a completely different direction with this years offering.
As like me, and many of you, Lin enjoys getting down and dirty with a little bit of Ink, Tim Holtz style'ie.
 So that's the technique I decided to use for her.. There is a subtle hint to her age on the clock face! She is neither 16 nor half past One though!!!
 So if you fancy turning thisinto this, here's how....
 I started off by choosing my card stock for the clock face... I'd had my eye on this selection of Core'dinations card stock for a while, about time I took it out of the packaging me thinks! There were 20 sheets of card stock in Grey's, Black's & Tan's. All printed with different designs.
 And it was difficult to choose which one to use but I plum'pt for this one.
 The greatest thing about this kind of card stock is not only can you emboss it with your own embossing folders and then sand it to reveal your image, it is also already embossed!!
 A light sanding will reveal the embossing.
 So, I cut an 11" Circle from the Platin Schoolbook Cartridge using my Cricut.
 I then cut out another Circle, this time onto some much thicker card stock so I needed to use my Deep cut Blade and the Multi cut Function to cut through the card stock.
 And then stuck to two together to give the Grey card some stability.
 I then sanded the edges to give a little more distress.
 Now for the numbers. We have a great selection of wooden shapes in the shop and these 4cm wooded letters are great for your Scrapbooking pages. And at just 18pence each, Yes 18p!!! a bargain to boot...
 I coloured both sides and the edges of the numbers with Stormy Sky Distressing Ink
 and laid them onto the clock face to make sure that they fitted OK. You will notice that YES, some of the numbers are the wrong way round.. This was intentional, remember I was going for a Tim Holtz style'ie,
 have you seen the way he puts "2011" together?
 Time for some more distressing. I took a number and randomly applied a two way glue pen to it.
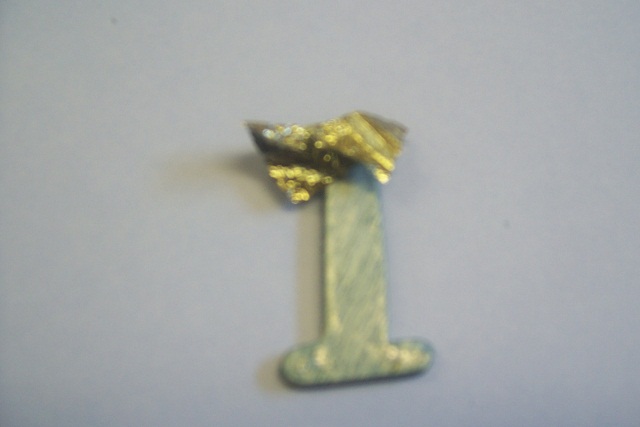 Adding some Gold Leaf, or in this case Verdigris/Gold leaf
 and then burnished the excess off.
 This was done with all of the numbers before they were adhered to the face of the clock with some Silicone Gel.
 I cut the hands of the clock from the Graphically Speaking Cricut Cartridge @ 4.5" using the Blackout function as the solid image
 and layering the standard image on top to give dimension.
 In keeping with the distressing theme I then added some more of the leaf to the clock hands
 before positioning them onto the clock face.
 Now for the box. I took some packaging that some backing papers were delivered in,
 marked and cut out a frame.
 Popping the clock into it to check that it fit.
Now for the fun (if messy) bit, distressing the box.
 I painted the whole of the box in some metallic Green Acrylic paint and dried it with my heat gun.
 I then applied a generous amount of PVA Glue
 and spread it out with the best crafting tools I have, MY HANDS!!!
 Whilst the Glue is still wet, paint on your top layer of Acrylic Paint. I used Silver. Try not to push to hard, you want the paint to sit on top of the Glue, not in it.
 Whilst that area starts to dry, carry on with the rest of the box.
 What you will notice is that the paint starts to spilt from the Glue.
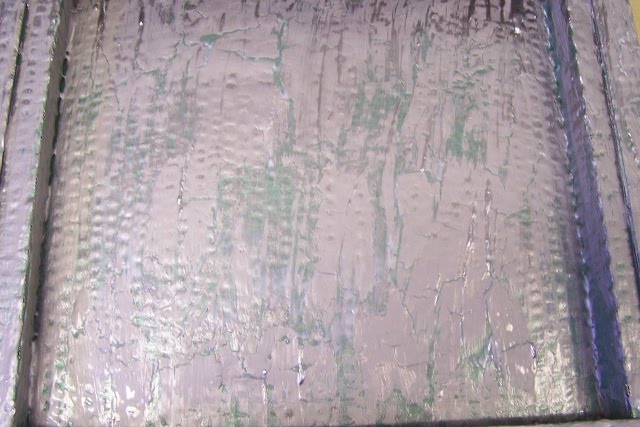 And as the Glue dries clear it reveals the Green underneath, therefore distressing it. The reason this happens is because the Acrylic Paint dries faster than the Glue, so the wet Glue slips a little revealing the colour underneath...
 Whilst this was drying, and it took a while!! I prepared my Leaves & Flowers. I used the Tim Holtz Tattered Leaves Die. This can either be used in the Sizzix Big Shot Machine or the Cuttlebug. If you are using it through the Cuttlebug take away your A Plate and substitute it with the Die.
 Add your card stock and 2 B plates.
 Et Viola!!
 I then cut out several leaf/petal shapes from the Mother's Day Bouquet Cricut cartridge @ 1", curving them slightly to give them some dimension.
 I added the leaves to the now dry box frame with some Silicone Gel
 and then positioned the petal shapes into the gel
 in a flower shape
 adding a gem in the middle to hide the Gel.
 I randomly arranged these around the frame.
 Now for my sentiment. I printed my words on my PC and cut it to size... If you look closely I actually misspelled a word, which I touched up manually when I noticed! oooppps! I also cut a frame from the Tag', Bag's Boxes & More Cricut Cartridge
 and layered the Two together
 before attaching it to the frame.
 Well, here's hoping Lin likes it and gets the T!m references...
Thanks for checking us out, see you soon.
Andy.
Oh my......................
ReplyDeleteLin will love it Andy - it really is stunning.
"Happy Birthday Lin!!!"
Toni xx
What a lucky lady absolutely beautiful Andy.
ReplyDeleteLyn (wed)
Hi Andy, I love you even more, I've only just picked up on the reference to my age, I think 2.30 would be more correct, but hey, 1.30 is good enough for me, I'll take that as a compliment!! I'm just a lucky girl to have such good friends in you all, shame about the 'holiday' though!! It's a wonderful card, and will go on the wall with the last one, what a gallery I will have... many thanks and lotsaluv.. French Lin ..xx..
ReplyDelete